[HBHW News] Oops

Published: Wed, 08/27/14

Editorial

Hello , 

*********************************

Correction

Apparently I was a little distracted this morning trying to wrap up the newsletter as quickly as possible. The featured recipe for this week is for Peach Pit Jelly, not Curried Pork Stew (which is yummy, but was last week's recipe). 

I've corrected it below. Enjoy! 

*********************************

Hi there and welcome to the next edition of the HBHW newsletter. I'm off to a bit of a rocky start this morning. I woke up to find our Internet not working. 

After a little searching online via my phone, I discovered that it was a coast-to-coast Time Warner outage. Not much to do other than pour myself another cup of coffee and get started on some housework. 

Thankfully the outage didn't last all morning and I was able to wrap this newsletter up for you. 

With harvest in full force, and plenty of fresh produce available at your local Farmer's Market, I thought we'd spend this week exploring canning. It's much easier than you think and I hope you will give it a try. 

You can start with something easy like jelly or jam, or get into pickling, making and canning tomato sauce and the likes. There's no time like the present to learn a new skill that also gives you control over what you're feeding your family and saves you some money along the way. 

Last but not least, don't forget to check out the latest "Tasty Bites". You can find these quick little posts here:

http://www.hillbillyhousewife.com/category/tasty-bites

I'm having fun and have been posting a new Tasty Bite every single day. How do you like them? Are the fun reads? Do you enjoy discovering new blogs? 


Image
Inspirational Quote

"Before the reward there must be labor. You plant before you harvest. You sow in tears before you reap joy."

Ralph Ransom

Featured Recipe of the Week

Peach Pit Jelly

Ingredients: 

  • peach pits, enough to half fill a large kettle
  • enough water to cover pits
  • 5 cups sugar
  • 1 pkg powdered pectin

Prepare 4 half pint jars and lids by sterilizing them, keeping them hot, and get your hot water bath canner ready.

Throw peach pits from cooking, eating or canning project into a large kettle, cover with fresh water (a couple inches over the pits) and just set aside on the counter overnight. 

Note: You want to end up with at least 4 cups of juice after boiling. The more pits you have in the pot of water, the richer and darker the jelly will be.

The next day put the pot on the stove and bring to a boil, cooking for about 30 to 45 minutes at a nice, rolling boil, but not too hard. Stir occasionally. Remember, you want to end up with 4 cups of juice, so add more water if you need to, and continue to boil.

Remove from heat and let sit long enough to handle.

Set up a 'jelly bag' over a pot, or lay several sheets of cheesecloth in a large colander suspended over a large pot.

Pour the mixture into the prepared strainer and allow to strain; do not push or force it.

When totally strained, measure 4 cups juice into a large cooking pot, stir in the sugar until it's dissolved, and put back on medium-high heat to return to a boil. 

When it boils, stir in the pectin, and return to a rapid boil, stirring constantly, for 1 minute.

Test with your cold metal spoon for doneness by dipping the spoon in the liquid and removing.  When jelly no longer drips from the spoon and slides off slowly in a sheet instead, it has jelled properly.

Remove the pot from the heat, skim off any foam, and ladle hot mixture into hot, sterilized jars, leaving about 1/4 to 1/2 inch headspace in jar. Apply the lids and process in hot water canner for 10 to 15 minutes (adjusting for altitude.)

Remove from heat, let sit for 5 minutes, then remove jars to a towel covered counter, leaving plenty of room in between jars for air circulation.  

Let sit undisturbed for 12 to 24 hours.

Yields 4 half pint jars.

and to see recipe variations. 

A Few Related Recipes 


You're welcome to share the recipe on Pinterest, Facebook etc. I'm also sharing a lot of recipes on the HBHW Facebook page. Click on through to check it out. As always, likes, comments and shares are much appreciated. :)

Peach Pit Jelly

Kindle News

Homemade Jelly And Jam Recipes 

Homemade Jelly and Jam Recipes is a collection of 35 tried and true family recipes for jellies, jams, fruit butters and marmalades from the Hillbilly Housewife. 

Made from fresh fruit and ingredients that YOU control these recipes not only taste better than store bought they also allow you the chance to create some hand-me-down recipes of your own. 

Don't worry if you've never made homemade jellies and jam before because you'll find information on jelly/jam making basics along with helpful tips and an FAQ section. 

Want to get started right away? No problem! The freezer jam recipes are easy to make and you don't need any special equipment. 

Here are just a few of the recipes you'll find inside: 

  • Strawberry Freezer Jam 
  • Grape Jelly 
  • Apple Jelly Made From Peels and Cores 
  • Red Currant Jelly 
  • Hot Pepper Jelly 
  • Peach Butter 
  • Apple Butter 
  • Orange Lemon Marmalade 
  • Fig Jam 
  • Strawberry Rhubarb Jam 
  • Apricot Jam

Order the Book on Amazon

Homemade Jelly and Jam Recipes
Canning Made Simple

Ready To Start Canning? I recommend you grab a copy of my ebook Canning Made Simple.

Inside you'll find over 40 canning recipes to get you started, along with simple to understand explanations about what to can, how to can, and even why to consider canning at all!

Click on here to buy your copy today!

Canning Made Simple - Preserving The Bounty

Frugal Fun on Facebook

We're having a lot of fun talking about all things frugal and homemaking on Facebook. Join in the discussion at the Hillbilly Housewife Facebook page. Be sure to like the page so you don't miss a thing. Here's just one of this week's topics. 

Are you canning this year?
Frugal Tip

Canning 101

I put together a short report for you called Canning 101. It goes over the basics of canning and is a great introduction if you've been thinking about giving canning a try. You can download it here:

Canning 101 (pdf)

As always you are welcome to share this free resource with family and friends.

Canning 101

For more canning tips and lots of canning recipes, I recommend you grab a copy of my  ebook Canning Made Simple.

Inside you'll find over 40 canning recipes to get you started, along with simple to understand explanations about what to can, how to can, and even why to consider canning at all!  Click on here to buy your copy today!

Read the Rest Of Tip (  comment, share, bookmark etc.)
Featured Article of the Week

How Canning Works - Learn The Basic Process Before You Begin

The canning world has seen little change since Nicholas Appert won the food preserving challenge put forth by Napolean Bonapart back in the early 1800s. Basically, you seal the containers, heat up the inside and when cooled, form a vacuum seal on the jar.

Now, there are a few different ways to can, as well as different requirements for canning certain items. So, before you get your canning equipment ready, there are things to know that will increase the likelihood for a successful outcome.

Let's take a look at the process of canning and how canning works.

The Basics

There are two main types of canning; boiling water and pressure. Different types of foods, based on their pH, their acid level, require a specific type of canning process. For instance, high acid foods like pickles work just fine in a boiling water canning process, while low acid foods like meats and most tomato products absolutely must be pressure canned.

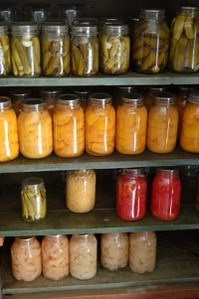
There are four main parts to canning; the jar, lid, ring, and heating device.  Of course, there are other tools that make canning easier, but let's focus on the basics first.

For home canning, glass jars are the most popular choice. Canning in the industrial setting uses the steel alloy cans you see on your supermarket shelves. Glass jars made specifically for canning at home will withstand heat and pressure and, if thoroughly cleaned, can be reused every year.

Lids, the flat part that seals the contents of the jar, cannot be reused because once they are sealed, the gasket begins to wear down.  Also, you will very often use a can opener to pry up a sealed lid, making a little dent in the lid.  That dent means the lid will never seal another jar properly.  This is an investment that you will make each time you start canning.

The ring holds the lid on during the heating process, keeping the lid from popping up, allowing water or steam to invade the contents of the jar.

The heating device is a large pot with a lid and a basket designed for holding the jars.  This device is either meant to hold boiling water or it's a pressure canner.  Keep in mind that each heating device is made for specific foods.  Also keep in mind that a pressure cooker is NOT a pressure canner and should not be confused.

Heating Process

The heating process is the most crucial part of canning. Once the jars are filled and lids and rings placed tightly on, the jars are placed in the heating device. As the heating begins, the foods in the jars begin to expand and vent a bit of air out of the jars.  Keep in mind that if the rings are too tight, air can't escape during heating; if rings are too loose, actual liquid may escape from the jars.  Always follow manufacturer's instructions on the lid and ring boxes.

Different foods require different amounts of heating and time. It's important to follow canning recipes and instructions to the letter.  Making sure you heat for the required time ensures that mold, yeasts, bacteria and any harmful enzymes that may be hanging around are destroyed.

Cooling Process

Once the jars are removed from the canning device, they begin to cool and the steam condenses back into water. Since there is now less air in the jar, a vacuum is created, pulling the lid down onto the jar. After the product has been cooled, the ring can be removed and the vacuum seal will still hold.

It is important to allow the items to cool thoroughly before you remove the rings to ensure a proper seal. Also, once cool, it is imperative to check the lids to make sure the seal took and there are no openings in the top of the jar. If there is a leak, be sure to consult your canning manual for what to do with the canned goods. Depending on the foods you canned, you may be able to reprocess, however many recipes will require you store the unsealed contents in the refrigerator and eat within a few days.

Knowledge is Power

Knowing how canning works allows us to make sure we have the best outcome in our canning process.  It gives us a way to understand if everything worked the way it should have. Make sure you have all the needed items before you begin canning to ensure a great experience, then go pick out some fresh produce and start canning!

Read the rest of the article, comment, share and bookmark.

How Canning Works
Please don't forget to "Pin" these articles and posts when you head to the Hillbilly Housewife website to read more. It helps get the word out about the site and the newsletter. Thank you!

A Little Something Inspirational...

Respect for Farmers

Final Thought

That's it from me for this week. I hope you have a wonderful a week . I'm getting used to having my mornings to myself again. While it seems a little too quiet today, I'm sure I'll get used to it in no time and have a lot more time and energy to dedicated to the HBHW website. 

Is there anything in particular you'd like to see on the site (or the Facebook Group for that matter) that I'm not doing right now?